

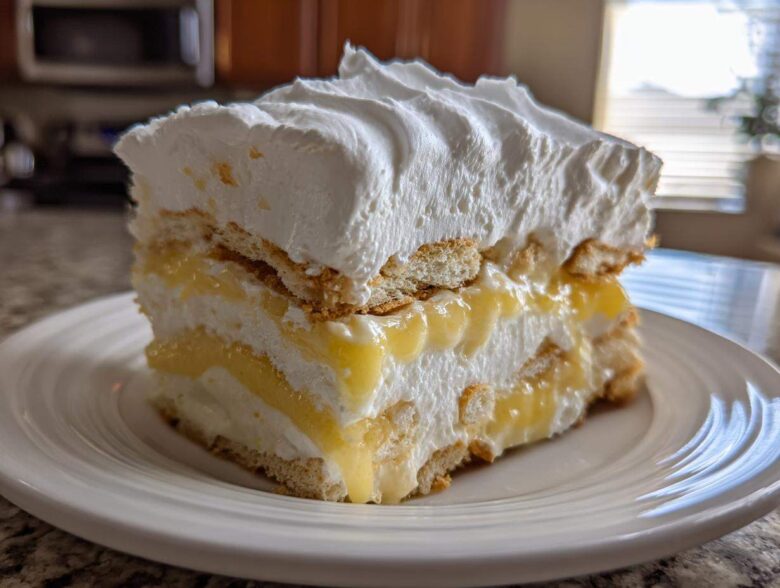
When summer hits and the thought of turning on the oven makes me sweat just looking at the dial, I reach straight for this recipe! Honestly, nothing beats a creamy, tangy, chilled treat when the asphalt is melting. This is my ultimate secret weapon: the No-Bake Lemon Icebox Cake. Yes, you read that right—zero baking required! I’ve made this so many times over the years for picnics and barbecues that I practically have the ingredients memorized. It sets up perfectly in the fridge, turning crisp wafers into something soft and totally dreamy. It’s the classic, easy-to-handle dessert that always vanishes first. If you love bright citrus flavors but hate the heat, you simply have to try this chilled method. It’s even simpler than my famous lemon loaf, which is saying something!
Why You Will Love This No-Bake Lemon Icebox Cake
Seriously, what’s not to adore about this recipe? It checks every single box for a perfect warm-weather indulgence. I keep coming back to it year after year because it requires so little fuss but delivers maximum payoff. I think you’re going to agree once you try it!
- It’s the definition of an easy lemon dessert—mixing takes less than twenty minutes before it goes into the cold!
- Absolutely no bake summer dessert stress here; we skip the oven entirely and rely on the refrigerator to do all the heavy lifting.
- That punchy, bright lemon flavor cuts through the humidity beautifully. It’s so refreshingly tart and creamy at the same time.
- Because of the simple layering, cleanup is a breeze, making this my go-to when I need something fast but impressive.
- It’s a fantastic make ahead lemon dessert! The flavors actually meld and deepen overnight, which I love.
Gathering Ingredients for Your Creamy Lemon Refrigerator Cake
Okay, let’s talk ingredients. This recipe is so brilliant because it relies on just a handful of simple pantry staples. You probably have most of this stuff sitting around right now! I want to stress the importance of getting that lemon flavor right, though. It’s the star player here, so please don’t cheat on the juice quality. You’ll want to double-check your pantry before heading out to the store, especially for that magical little can of condensed milk. You can find more tips on using sweetened condensed milk in desserts on my other post, but here is what you need for this specific cake.
Here is the exact list I use every single time—don’t swap anything until you’ve tried it my way first!
- One (14 ounce) can of sweetened condensed milk. This is the base of our creamy magic and provides all the necessary sugar, so you won’t need any granulated sugar floating around!
- A full 1/2 cup of fresh lemon juice. I mean it—freshly squeezed only! This juice is what chemically reacts with the milk to create that firm, thick filling that characterizes a great creamy lemon refrigerator cake.
- One teaspoon of lemon zest. Fine zest only, please. It adds such a bright aromatic pop that you miss if you skip it.
- One teaspoon of vanilla extract. Just a touch to round out all that citrus tang.
- One (8 ounce) container of frozen whipped topping, thawed. Make sure it’s fully thawed before you start folding it in! If you are feeling ambitious and want to whip your own, grab 2 cups of heavy cream and whip it to stiff peaks separately before moving to the next step.
- One (11 ounce) box of vanilla wafers or graham crackers. This is your structure! Whatever you choose, make sure they are crisp when you start layering.
Essential Equipment for the No-Bake Lemon Icebox Cake
Because this simple no bake cake relies on chilling rather than baking, you don’t need a mixer or fancy gadgets, which is part of why I love it so much. But you do need a few simple things ready to go so that layering happens quickly before that lemon filling tries to set up on you!
Make sure these essentials are clean and handy before you even crack the first lemon:
- A medium-sized mixing bowl for preparing the base filling.
- A sturdy whisk—you need some elbow grease for mixing that condensed milk!
- An 8×8 inch baking dish, or if you prefer a taller, sliceable cake, grab a standard loaf pan.
- Plastic wrap. This is non-negotiable for keeping that creamy lemon dessert fresh and preventing freezer smells from getting near it.
Step-by-Step Instructions for the Simple No Bake Cake
Putting together this No-Bake Lemon Icebox Cake is almost like playing with edible building blocks! The key here is speed once you start assembling, because that lemon juice starts working its magic right away. I always have my wafers ready to go before I pull the cooled whipped topping out of the fridge. Don’t panic if your filling seems a little thin at first; it’s supposed to, thanks to the chemistry involved in a true icebox recipe. Follow these steps, and you’ll have a gorgeous, chilled dessert ready for the fridge!
Creating the Bright Lemon Filling Base
Grab your mixing bowl and let’s get that vibrant filling going. You’re going to take your whole can of sweetened condensed milk, the fresh lemon juice, that gorgeous zest, and the vanilla. Whisk it all together super well until you see it start to combine. Now, listen closely: the lemon juice is acidic, and you’ll notice it starts to thicken almost immediately—that’s the chemical reaction happening that sets our “cake”! Next, gently fold in half of your thawed whipped topping. I mean *gently*. You aren’t beating meringue here; you just want streaks of white disappearing into the yellow base so you keep all that lovely air trapped inside. This light, airy texture is what makes this an amazing icebox cake recipe.
Assembling Layers for the Quick Lemon Layered Dessert
Time to layer! Think thin layers first. Spread just a thin coat of your lemon cream mixture right onto the bottom of your 8×8 dish. This first layer helps grip the wafers so the whole thing doesn’t slide out later. Next, arrange a single, tight layer of vanilla wafers or graham crackers directly on top of that cream. Now, spread half of your remaining lemon filling mixture over those cookies. Once that’s done, repeat the whole sequence: another layer of wafers, and then top it all off with the rest of that beautiful lemon filling. Don’t worry about making the top layer pretty yet—we’re just building structure for this quick lemon layered dessert!

Chilling Time for the No-Bake Lemon Icebox Cake
This step is where patience pays off big time. Once the lemon layers are assembled, take your remaining whipped topping and spread it evenly over the top. Make it smooth or swirl it up—that’s your call! Cover the dish tightly with plastic wrap. This is important so the cake doesn’t pick up any funky fridge smells. Now, we chill. You need a minimum of six hours here, but honestly, if you can resist the temptation and let it sit overnight, that’s when the real magic happens. The lengthy chill time is crucial because it allows the cookies underneath to soak up that tangy moisture and truly soften into a moist, cake-like texture. Enjoy the waiting game!

Tips for the Best No-Bake Lemon Icebox Cake Results
I know a recipe is great, but getting that *perfect* texture—that light, airy, yet undeniably set finish—that takes a little insider knowledge. Getting the best no bake lemon dessert means paying attention to a couple of non-negotiable details in those notes I included, especially regarding your dairy and your citrus. Trust me, these tiny tweaks make a world of difference when you’re craving a truly phenomenal slice!
First up, let’s talk about that thickening power. If you want that creamy filling to be firm enough to slice cleanly, you absolutely must use fresh lemon juice.
I can’t stress this enough: bottled stuff just doesn’t have the same acidity level. It won’t react strongly enough with the sweetened condensed milk, and you risk having a soupy layer instead of that satisfyingly thick base for your wafers. Freshness is flavor, and in this case, freshness is structure!
Next, the topping choice. If you decide to whip heavy cream yourself (which tastes richer, if I’m being honest!), remember that the cream needs to be whipped to stiff, *stiff* peaks. Don’t stop when it’s just soft, or it will deflate quickly when you fold it in. If you use the store-bought thawed topping, just make sure it’s fully, completely thawed but still cool. If it’s too cold, you get lumps; if it’s too warm, you deflate the air you need.
My personal tip for presentation, especially if you are using a loaf pan, is this: try reserving just a tablespoon of that beautiful lemon zest and sprinkle it over the top layer of whipped topping right before you cover it for chilling. It gives the whole thing a gorgeous pop of color, and you get that intense lemon aroma the second you pull the plastic wrap off. It just elevates this lemon cream dessert from “easy” to “Stunning!” for zero extra effort. For more twists on a wonderful lemon cream dessert, keep checking back!

Ingredient Substitutions for Your No-Bake Lemon Icebox Cake
Listen, I know sometimes you need to make a recipe work with what you have in the cupboard, and that’s totally fine! While I stand by my original ingredient list for the absolute best outcome, we can definitely talk about swapping elements in this No-Bake Lemon Icebox Cake without turning it into a texture disaster. The key to keeping this a successful graham cracker lemon dessert (or wafer dessert!) is understanding what each ingredient actually *does* to the final set.
Let’s tackle the biggest decisions first—the crunch factor and the creaminess factor.
Graham Crackers Versus Vanilla Wafers
This is probably the most common substitution question I get! My recipe calls for vanilla wafers because of how wonderfully soft and almost cake-like they become after soaking up that tangy cream. They have a higher fat content and a thinner profile, which helps them truly melt into the background.
If you use graham crackers instead, you get a slightly different final texture for your chilled lemon dessert recipe. Graham crackers will hold their shape a little longer and offer more visible structure between the layers. They also bring a bit more honey/malty flavor, which pairs nicely with the lemon, but they soak up moisture a bit slower. It’s not bad at all—just different! If you go this route, make sure you let that cake chill the full overnight time if possible so the crackers fully soften up. You can see how good they look in my graham cracker lemon dessert post, too!
Dealing with Cream: Heavy Cream Versus Whipped Topping
If you’re trying to decide between whipping your own heavy cream or using the thawed, store-bought frozen stuff (like Cool Whip), remember this: stability versus flavor!
The store-bought frozen topping is incredibly stable. It stays light and fluffy even after sitting in the fridge for a couple of days, making it a rockstar for a make ahead lemon dessert. On the flip side, if you whip your own heavy cream, you’ll get a richer, more pronounced dairy flavor, which I prefer. However, homemade whipped cream has a tendency to weep or deflate slightly after the 24-hour mark. If you use heavy cream, use the stiffest peaks you can manage when folding it in, as that extra stability will help your light and airy lemon cake hold its tower a little longer!
Thoughts on Citrus Zest Swaps
The recipe calls for lemon zest, and I stand by that because the oils in the zest are pure lemon perfume! If you don’t have zest, skip it rather than adding extra lemon juice, because that acidic overload will change how your sweetened condensed milk lemon dessert sets up.
However, if you want to get creative, a tiny bit of orange zest mixed in with the lemon zest is fantastic! It adds a lovely warmth without changing the structure. Just make sure you’re zesting thinly, avoiding that bitter white pith beneath the yellow exterior. That pith ruins everything, trust me!
Serving Suggestions for This Light and Airy Lemon Cake
Once your No-Bake Lemon Icebox Cake has chilled overnight—and trust me, waiting is worth it—it’s time to make it look as amazing as it tastes! Since this is already such a visually appealing, classic icebox cake, you really don’t need to do much work, but a little garnish goes a long way in making the presentation pop. Remember, we’re aiming for light, bright, and refreshing here!
My favorite way to serve this is slightly chilled, right out of the refrigerator. The creamy lemon filling is perfectly firm but still soft, and those wafer layers are completely tender. It’s the ideal vehicle for simple, fresh toppings that bring out the citrus even more.
Simple Finishing Touches
When you are ready to pull this out for company, you just need a few small touches on top. I usually save a tiny pinch of that bright yellow lemon zest I mentioned earlier and sprinkle it lightly right before slicing. It smells wonderful and gives the top a professional look.
If you have any fresh mint around, even just a few small sprigs tucked onto the corners of the dish adds such a beautiful contrast of green against that pale yellow and white cream. It just signals “freshness” instantly!

Perfect Pairings
Because this cake is already so wonderfully rich and creamy—thanks to that sweetened condensed milk base—I actually prefer to serve it with something sharply tart or slightly acidic on the side rather than something heavy like chocolate sauce. Think light and fruity!
- A small bowl of fresh raspberries or blueberries served alongside each plate is heaven. Their slight tartness balances the sweetness of the cake perfectly.
- If you want to lean into the citrus, a few thin slices of candied lemon are just gorgeous on top, although this requires a tiny bit more prep work.
- It pairs beautifully with just a simple cup of black coffee or a cold glass of unsweetened iced tea. This cake doesn’t need any heavy accompaniments!
It’s the perfect, stunningly simple finale for any meal, especially when you’re looking for a light and airy lemon cake option that feels elegant without ever touching the oven!
Storage and Make Ahead Tips for the No-Bake Lemon Icebox Cake
This magical aspect of the No-Bake Lemon Icebox Cake is that it just keeps getting better as it rests happily in the cold! Storage is the easiest part of this whole process. You must keep it covered tightly with plastic wrap while it’s in the refrigerator. This stops it from drying out and keeps those wonderful lemon aromas trapped inside where they belong.
Now, about making it ahead: This is truly one of the best make ahead lemon desserts you will ever find. While the minimum required chill time is six hours, I insist you aim for overnight chilling. That extra time allows the wafers to fully transform into that tender, cakey layer we are aiming for. As for reheating? Absolutely not! This is a chilled serving only. Just pull it out about fifteen minutes before you intend to slice it. That’s it—perfection achieved with zero morning-of stress!
Frequently Asked Questions About No-Bake Lemon Icebox Cake
I know you’re going to have questions when you start making this—it’s such a fun chemistry experiment! Since this isn’t a traditional baked cake, people often worry about the texture setting up correctly. That’s totally understandable! But don’t fret, I’ve answered the top things folks ask me about making sure their chilled lemon dessert recipe turns out heavenly every time.
Can I use lime juice instead of lemon juice?
You absolutely *can* use lime juice, but then you have a No-Bake Lime Icebox Cake, and that changes the flavor profile entirely! If you want to make that swap, go for it! However, if you stick with lime, you should also swap the lemon zest for lime zest. The actual thickening reaction with the sweetened condensed milk should be nearly identical, as it relies on the acidity, not the specific fruit. If you use lime, you might want to garnish with some fresh berries to cut the intense lime tang!
Why didn’t my lemon filling thicken properly?
Oh, that’s the most common hiccup! If your filling is still very runny after whisking, I bet you reached for bottled lemon juice instead of fresh. Remember how I stressed using fresh? Bottled juice often lacks the necessary acid strength to properly react with the condensed milk, resulting in a thin, soupy mess instead of that rich lemon cream dessert base. If you find yourself in this situation, immediately whisk in another teaspoon or two of fresh lemon juice until you see it start to firm up before you fold in the topping!
How long can I keep this make ahead lemon dessert in the fridge?
This is one of the best parts about the classic icebox cake structure! Because this dessert relies on chilling and the cookies soak up the moisture, it lasts quite a while. I’ve successfully made this and kept it covered tightly in the refrigerator for up to four full days, and it tastes amazing every time. The wafers get softer and more cake-like the longer they sit, so it’s truly a great make-ahead option for busy weekends. You can find more storage tips on my general chilled lemon dessert recipe guide!
Is this truly light and airy, or is it too heavy?
It is genuinely one of the lightest desserts you’ll ever have! The “heavy” part comes from the fat in the condensed milk, but we actively fight that weight by folding in a full container of whipped topping, which incorporates so much air. That folding technique breaks up the heavy base, which is why we focus so hard on doing it gently in the recipe. It sets up firmly enough to slice but feels incredibly light and airy on the palate. It never feels dense like a traditional pound cake!
PrintNo-Bake Lemon Icebox Cake

You make this simple, chilled lemon dessert by layering crisp wafers with a creamy lemon filling. It sets in the refrigerator for a light, airy cake.
- Prep Time: 20 min
- Cook Time: 0 min
- Total Time: 6 hr 20 min
- Yield: 8 servings
- Category: Dessert
- Method: Chilling
- Cuisine: American
- Diet: Vegetarian
Ingredients
- 1 (14 ounce) can sweetened condensed milk
- 1/2 cup fresh lemon juice
- 1 teaspoon lemon zest
- 1 teaspoon vanilla extract
- 1 (8 ounce) container frozen whipped topping, thawed, or 2 cups heavy cream, whipped to stiff peaks
- 1 (11 ounce) box vanilla wafers or graham crackers
Instructions
- In a medium bowl, whisk together the sweetened condensed milk, lemon juice, lemon zest, and vanilla extract until fully combined. The mixture will thicken slightly.
- Gently fold half of the thawed whipped topping into the lemon mixture until just combined.
- Spread a thin layer of the lemon mixture on the bottom of an 8×8 inch baking dish or loaf pan.
- Arrange a single layer of vanilla wafers or graham crackers over the lemon mixture.
- Spread half of the remaining lemon mixture over the wafers. Repeat the layering process: wafers, then the remaining lemon mixture.
- Top the cake with the remaining whipped topping, spreading it evenly over the top layer.
- Cover the dish tightly with plastic wrap. Chill in the refrigerator for at least 6 hours, or preferably overnight, to allow the wafers to soften.
- Slice and serve cold.
Notes
- If you use heavy cream instead of whipped topping, whip the cream separately until stiff peaks form before folding it into the lemon mixture.
- For a richer lemon flavor, use fresh lemon juice only; bottled juice may not thicken the mixture as effectively.
- You can garnish the top with extra lemon zest or thin lemon slices before serving.
Nutrition
- Serving Size: 1 slice
- Calories: 350
- Sugar: 45g
- Sodium: 150mg
- Fat: 15g
- Saturated Fat: 8g
- Unsaturated Fat: 7g
- Trans Fat: 0g
- Carbohydrates: 50g
- Fiber: 1g
- Protein: 5g
- Cholesterol: 30mg